HTTP Requests
Alright, so now we're starting to get to the fun stuff. The JavaScript code that we have been writing in this course has all been front-end code, meaning it is being run in the browser on the client machine as opposed to on the server or the back-end. You can write server-side JavaScript with Node.js, but that's way beyond what we're learning now. However, there will be times when you'll want to fetch some data from some kind of API on a server, or send some data to a server from a form. This is where HTTP requests come in. The server could be either your own back-end that you wrote with Node.js or another language like Python or Ruby, or it could be a public third-party API. We'll be working with a couple third-party APIs in this course. We interact with APIs by making HTTP requests.
What is an HTTP request?
HTTP stands for HyperText Transfer Protocol. It is the protocol that is used to send and receive data on the web.HTTP is a client-server protocol, which means requests are initiated by the client, usually the web browser, and the server will respond with a response. Every time that you go to a web page, your browser is making a request to a server. The server is responding with things like HTML, CSS, and JavaScript files. It may also respond with images, videos, and other media as well as data formatted as JSON or XML. When we fetch data using JavaScript, it is usually JSON data. If you go to your browser's developer tools network tab, you can see the requests that are being made to the server. You can also see the responses that are being sent back.
Making HTTP requests
You can make HTTP requests right from your JavaScript code without having to refresh the page. There are a few ways to do this. The old way of doing this was to use AJAX, which stands for Asynchronous JavaScript and XML. You can still use AJAX to make HTTP requests, but it's not the most common way to do it anymore. The most common way to make HTTP requests is to use the fetch() API. The fetch() API is a promise-based API, which means that it returns a promise that will resolve with the response from the server. We're going to get into fetch() and promises, but first, I'll show you how to make an HTTP request with AJAX and the XMLHttpRequest object. You probably won't use this method much, but it's good to know how it works.
JSON responses
When you make an HTTP request from your JavaScript code, the server will respond with some data. The data can be in a variety of formats, but the most common format is JSON. We talked about JSON earlier, but let's have a little refresher. JSON stands for JavaScript Object Notation. It is a way to represent data in a format that is easy for both humans and machines to read and write. We used to use XML (Which is why the X in AJAX stands for XML), but it's become more common to use JSON because it's easier to work with. We'll be fetching JSON data from the APIs that we'll work with. We can then use that data in our web page.
HTTP Methods
When you make an HTTP request, you need to specify what kind of request you're making. There are a few different types of requests, but the most common ones are GET, POST, PUT, and DELETE. We'll mostly be using GET in this course.
GETrequests are used to retrieve data from the server. In fact, every time you visit a webpage, you are making aGETrequest.POSTrequests are used to send data to the server. Usually when you submit a website form, it makes aPOSTrequest.PUTrequests are used to update data on the server. There's also aPATCHmethod that can be used to update.DELETErequests are used to delete data on the server.
There are other less common methods, but these are the main four. When you use the fetch API or AJAX, you can choose which type of request you want to make.
HTTP Status Codes
I'm going to mention HTTP status codes here, but this is not something you really need to remember right now. You'll learn them in time. When you make an HTTP request, the server will respond with a status code. The status code will tell you if the request was successful or not. Status code ranges have specific meanings.
100range is just continue or processing. It j=means the request is not done yet, but is ok up to that point. You don't work with 100 range responses very often.200range means success and everything went as it should. 200 is what you want.300range means some kind of redirect.400range means there was a client error. So basically, it's your fault whether that is a missing field in a form or if you're unauthorized to make that request.500range is a server error. So it's not the client's fault something went wrong on the server in the back-end code.
Common Codes
Here are som very common codes. These are the main codes you will run into:
-
200: Success
-
201: Success and something was created
-
204: Success but no content returned
-
301: Permanent redirect
-
400: Bad request
-
401: Unauthorized
-
403: Forbidden
-
404: Resource not found
-
500: Something wrong on server
Read more about status codes here.
An Example Request
Let's make a request to an API right from our browser. We'll use the public GitHub API. APIs have different endpoints, which are just URLs that you can make requests to using certain HTTP methods to achieve certain results. The GitHub API has a few different endpoints, but we'll use the users endpoint. The users endpoint will return information about a GitHub user. Later, we'll do this from our code, but for now, let's go to the following URL in the browser:
https://api.github.com/users/484021
You can replace my username with your own if you want. This will return a JSON object with information about the user. The data will show right in the browser. You can also see the response in the browser's developer tools network tab along with the headers and any other information including the status code of 200, which means successful.
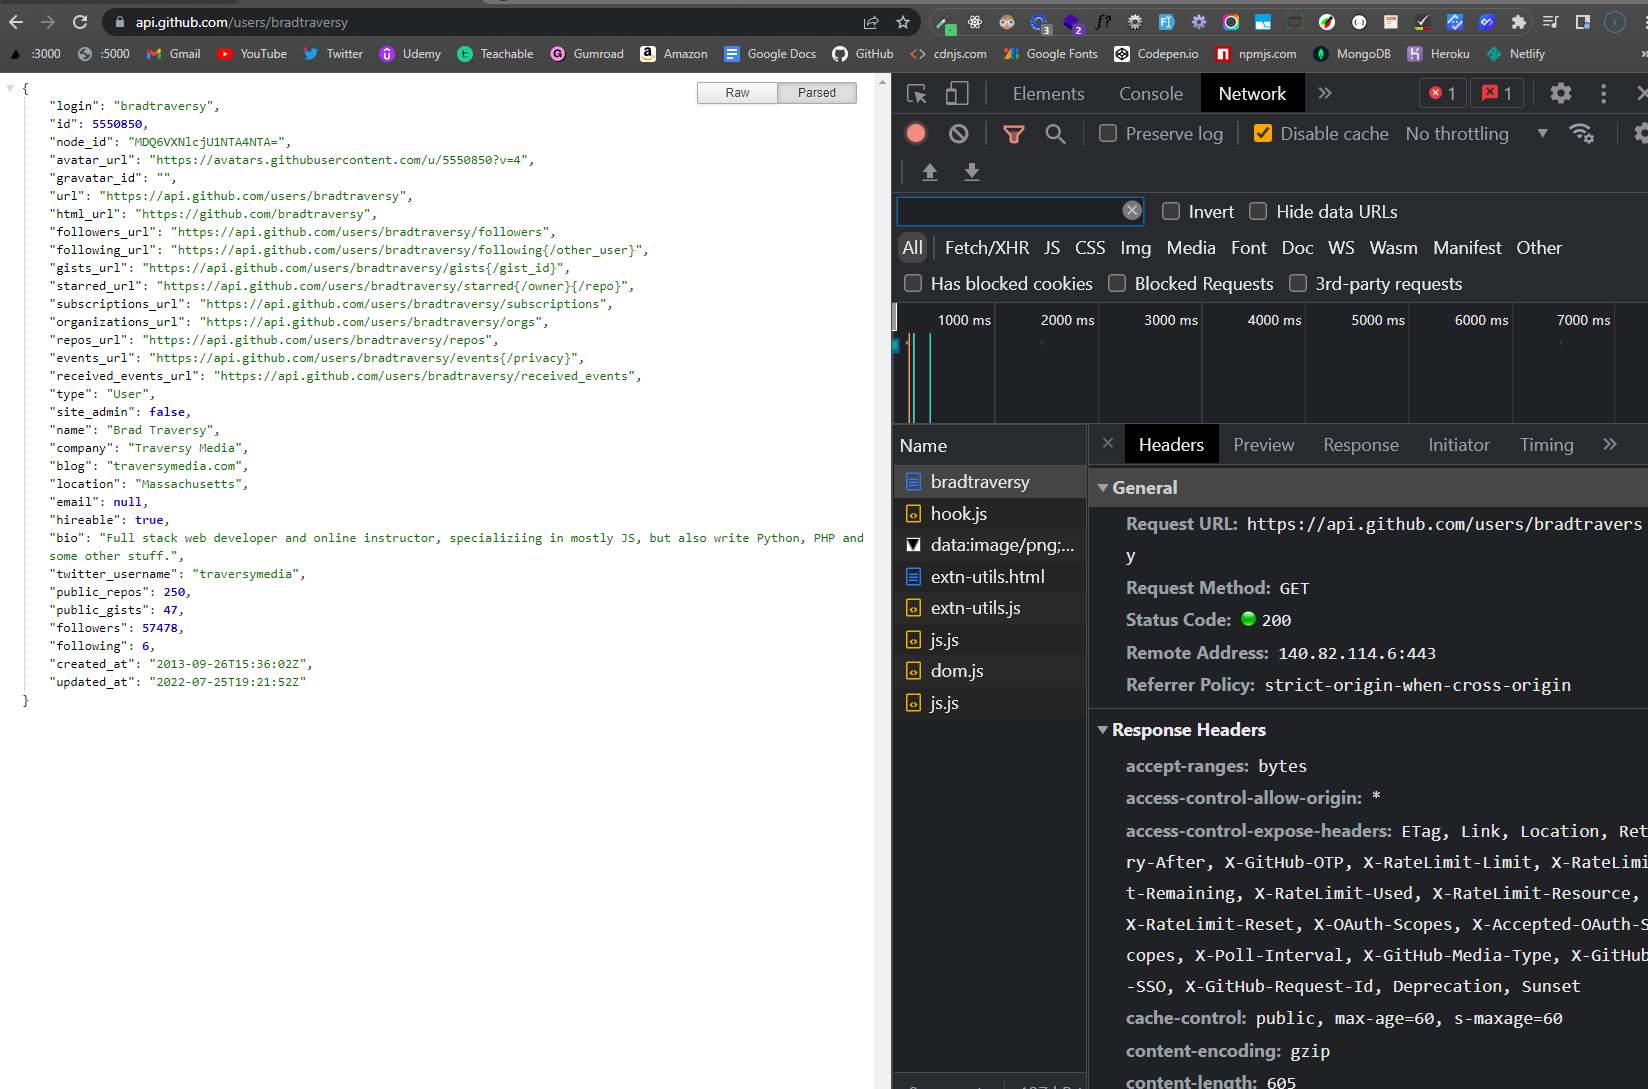
If we made this request from our code, we could then use any of this information in our web page. We'll do this later on. For now, I just wanted to get you familiar with making HTTP requests and seeing the response.